
HARPY ENTERPRISES RESOURCES
Flooring, Tile & Interior Finish Resources
Practical guidance from Harpy Enterprises, a Southwest Florida flooring and interior finish specialist. These resources help homeowners, property owners, builders and project partners understand preparation, installation methods, materials, paint and color choices, and the decisions that matter before work begins.
We Don’t Cut Corners — We Build Trust.
OUR PRINCIPLE
Learn What Happens Before the Finish
The finished surface is what everyone sees. How it performs over time usually depends on the work underneath it — the steps that are covered up before the project is complete. That is why Harpy Enterprises works by a simple principle: What You Don’t See Matters Most.
A typical flooring or tile project moves through a sequence: evaluating the existing surface, removing old materials where needed, preparing the substrate, checking flatness, installing membranes or waterproofing where the assembly calls for them, planning the layout, setting the material with an appropriate method, and finishing the transitions and details. Each step affects the next.
The guides below explain these steps in general terms. Every project is different, and conditions such as cracks, moisture or uneven slabs need to be evaluated on site before any specific recommendation is made.
Doing It Right From the Beginning.
RESOURCE GUIDES
Explore the Resource Guides
Choose a topic to go straight to that guide on this page.
01
Floor Preparation & Substrates
Removal, residue, flatness, cracks and the membranes that support a long-lasting floor.
02
Tile & Large-Format Porcelain
Layout planning, flatness, grout joints and transitions for porcelain and large-format tile.
03
Showers & Waterproofing
Why waterproofing sits beneath the tile, and the details that need the most attention.
04
Professional Installation Systems
How Schluter® and PROFLEX® waterproofing, uncoupling, crack-isolation and underlayment systems serve different roles in tile and flooring assemblies.
05
Flooring Materials & Installation
Porcelain, SPC/LVP, engineered wood and laminate — and what to consider before covering an existing floor.
06
Kitchen & Interior Finish
Cabinets, backsplash, countertops, vanities, trim and feature walls, and how finish trades are sequenced.
07
Residential Painting & Color
Surface preparation, paint sheen, color selection and interior and exterior painting considerations for Southwest Florida homes.
08
Project Planning & Maintenance
Southwest Florida conditions, a planning checklist and care basics before you request an estimate.
GUIDE 01
Floor Preparation & Substrates
A new floor can only be as stable and flat as the surface beneath it. Preparation is where much of the long-term outcome is decided — and it is the part of the project that is no longer visible once the finish is installed.
KEY TOPIC
Why Tile Preparation Matters
Tile is a rigid finish. It relies on the substrate for support and on the setting material for its bond. When preparation is rushed, problems such as hollow-sounding tiles, uneven tile edges (lippage) or cracking can appear later — sometimes long after the project is finished.
Careful preparation does not remove every risk, but it addresses many of the conditions that commonly lead to these problems. It is the foundation of Harpy Enterprises’ flooring installation and substrate preparation services.
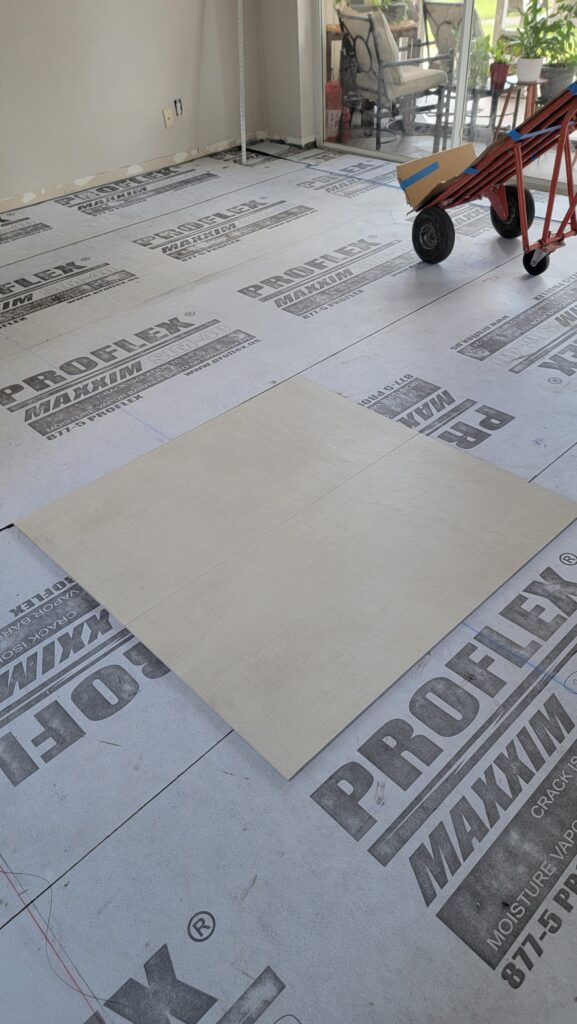
Removal to the Appropriate Substrate
When existing flooring is removed, the goal is to reach a sound surface that the new installation can bond to or rest on. What counts as appropriate depends on the existing assembly and the new material, so it is confirmed once the old floor has been opened up and inspected.
Thinset & Adhesive Residue
Old thinset ridges, mastic and adhesive left behind can create high spots, weak bonding areas or compatibility issues with new setting materials. Depending on what is found, residue may need to be ground, scraped or otherwise removed.
Grinding & Cleaning
Grinding can remove residue and high spots, and thorough cleaning removes the dust and debris that interfere with bonding. In a preparation-first approach these are routine steps, not optional extras.
Substrate Flatness
Flatness requirements depend on the material and its size — large-format tile and click-together flooring are generally less forgiving of an uneven substrate. Low areas may need patching or leveling, and high areas may need grinding, before installation begins. Flat is not the same as level: a floor can be acceptably flat for tile even if the building is not perfectly level. When needed, patching or self-leveling compounds correct low areas — a decision made after removal exposes the actual substrate.
Cracks & Existing Conditions
Cracks, previous repairs and uneven areas are common in existing floors. Some are minor; others can indicate movement that needs further evaluation. They should be assessed in person rather than diagnosed from photos alone.
Primers, Crack Isolation & Uncoupling
Some leveling and setting products call for a primer, and some assemblies benefit from a crack-isolation or uncoupling membrane between the substrate and the tile. Whether one is appropriate depends on the substrate, the material and the manufacturer’s instructions.
FLOOR SYSTEM EDUCATION
Understanding PROFLEX® Underlayment & Crack-Isolation Systems
Some tile and flooring installations include an intermediate membrane between the prepared substrate and the finish material. Harpy Enterprises uses PROFLEX® products on selected flooring and wet-area projects when they are appropriate for the assembly. A membrane is one designed layer of the floor — not a substitute for evaluation, grinding, cleaning, repairs, priming or leveling where those steps are required.
What an Underlayment Membrane Does
Depending on the product, a membrane between the substrate and the finish can help isolate the finish from certain substrate cracks, manage moisture vapor where applicable, or reduce sound transmission. Each product is designed and tested for specific functions, so the right choice depends on what the floor actually needs.
PROFLEX® MAXXIM SIM-40
SIM-40 is a 40-mil peel-and-stick composite membrane — a rubberized layer bonded to a reinforcing fabric — designed for crack isolation beneath approved tile, stone and other manufacturer-listed flooring. It is installed across the prepared substrate before the finish flooring, as part of the manufacturer’s system.
Where a Membrane Fits in the Floor
Prepared slab → primer or preparation as required → membrane → setting material → finish flooring. Each layer depends on the one beneath it, which is why system requirements and approved setting materials matter as much as the membrane itself.
Sound-Control Underlayments
Some PROFLEX® underlayments, such as MAXXIM SIM-90, are designed to help reduce sound transmission within a complete floor-ceiling assembly. Impact noise comes from footsteps or objects striking the floor; airborne sound, such as voices, travels through the air. Published IIC and STC ratings come from tests of specific assemblies — slab thickness and ceiling construction change the results — so a membrane alone does not guarantee a building rating. See PROFLEX’s sound-control membranes.
Moisture & Vapor Considerations
Concrete can release moisture vapor, and some flooring assemblies are sensitive to it. Certain membranes offer limited vapor protection, while dedicated moisture-mitigation products are designed for higher moisture conditions. Moisture testing and the flooring manufacturer’s limits help determine what an assembly needs.
Limits Still Apply
Crack-isolation membranes are rated for specific crack types and widths. Manufacturers generally exclude structural movement cracks and expansion joints, which call for different treatment — and sometimes further evaluation — before any finish work proceeds.
Product information is summarized from PROFLEX® published resources; installation always follows the manufacturer’s current instructions. PROFLEX® and MAXXIM are trademarks of their owner.
GUIDE 02
Tile & Large-Format Porcelain
Porcelain tile — and large-format porcelain in particular — rewards careful planning. Many of the details that make a tile floor or wall look right are decided before the first tile is set.
Layout Planning
Layout determines where cuts land, how the pattern meets walls, doorways and focal points, and whether thin slivers of tile can be avoided. It is usually planned by measuring or dry-laying the space before setting begins.
Large-Format Considerations
Larger tiles can mean fewer grout lines, but they also tend to require a flatter substrate, more complete mortar coverage and careful handling. Setting materials and methods are selected based on the tile and the manufacturer’s guidance.
Rectified Porcelain & Grout Joints
Rectified tiles are cut to tighter dimensional tolerances, which can allow narrower grout joints. The right joint width still depends on the tile’s actual size variation, the manufacturer’s recommendations and the installation conditions — there is no single correct number for every project.
Pattern Choices
Offset, diagonal and herringbone layouts change the amount of cutting, waste and planning involved. Some manufacturers also give guidance on offset percentages for longer tiles, which helps manage edge height differences.
Transitions & Edges
Where tile meets another floor, a doorway or a wall, transition and edge profiles help manage height differences and protect tile edges. Planning them early avoids awkward details at the end of the project.
Visible vs. Hidden Details
Straight grout lines and clean cuts are visible. Mortar coverage, flatness and movement accommodation are not — but they influence how the installation performs over time.
See finished examples in the Harpy Enterprises flooring and tile portfolio.
GUIDE 03
Showers & Waterproofing
A shower is an assembly of layers. The tile is the part you see; the layers behind and beneath it do much of the work of managing water.
KEY TOPIC
What Waterproofing Does Before Tile Is Installed
Tile and grout are finish materials. They shape how a shower looks, but they are not the waterproof layer — grout and many tile installations can allow moisture to pass through. Waterproofing is installed beneath the finish, as part of the shower assembly, to help keep water away from the wall framing, substrate and surrounding structure.
Because it is covered by tile, the waterproofing has to be planned and installed correctly the first time. It is a core part of Harpy Enterprises’ shower tile and waterproofing services.
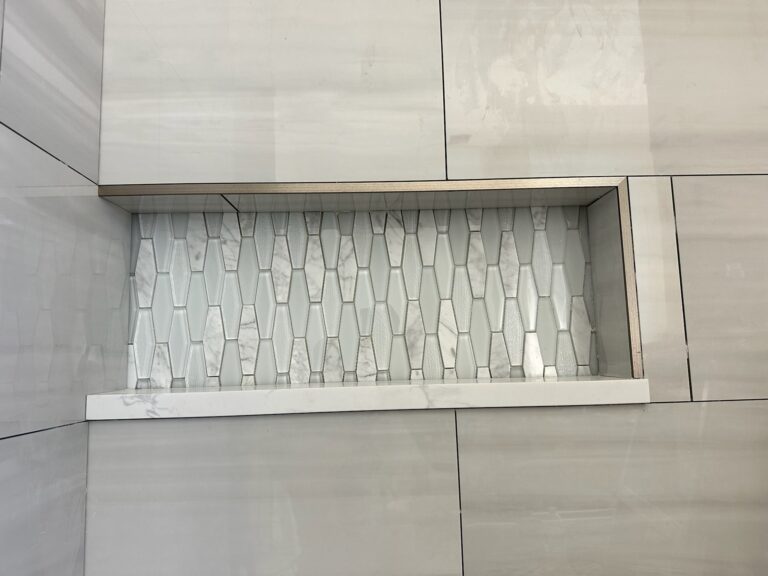
Seams, Corners & Penetrations
Waterproofing problems often start at details rather than flat areas: seams between sheets or boards, inside and outside corners, and penetrations for valves, shower heads and drains. These areas are treated according to the system manufacturer’s instructions.
Niches, Benches & Curbs
Each built-in feature adds corners, edges and surfaces that need to be waterproofed and, where water collects, sloped correctly. They are worth planning early because they affect framing, layout and tile cuts.
Choosing a Waterproofing System
Depending on the project, Harpy Enterprises works with systems such as Schluter, PROFLEX and DensShield. These products are not interchangeable: components are selected for the specific assembly and scope, and installed following each manufacturer’s instructions.
Realistic Expectations
A correctly detailed waterproofing assembly is designed to manage water, but long-term performance also depends on the rest of the shower, plumbing and fixture work, and ongoing maintenance. No installation method removes every risk, which is why each detail deserves attention.
GUIDE 04 · TILE SYSTEM EDUCATION
Understanding Schluter® Waterproofing & Uncoupling Systems
Schluter® Systems makes several products that can form part of a tile or shower assembly. Each has a specific job, and they are designed to work together as a system. Harpy Enterprises uses Schluter® waterproofing and uncoupling products on selected projects when they are appropriate for the assembly and the project requirements. This guide explains, in general terms, what the main components do.
Tile Is the Finish, Not the Waterproofing
Tile and grout are the visible finish. In a wet area, the layer directly beneath them is what manages water. A bonded waterproofing assembly places that layer right behind the tile, so moisture is kept near the surface instead of reaching the wall or floor structure.
Schluter®-KERDI
KERDI is a thin, flexible sheet membrane that is bonded to the substrate with thin-set mortar and tiled over directly. It serves as both a waterproofing layer and a vapor retarder in appropriate tiled wet areas — such as showers and bathtub surrounds — when it is installed according to the manufacturer’s instructions.
KEY TOPIC
Seams, Corners & Penetrations
A membrane is only as continuous as its details. In KERDI assemblies, seams and wall-to-floor connections are typically covered with KERDI-BAND strips, inside and outside corners use preformed corner pieces, and shower-head pipes and mixing valves receive dedicated seals.
These details are completed and checked before any tile is installed — once the tile goes up, they can no longer be seen.
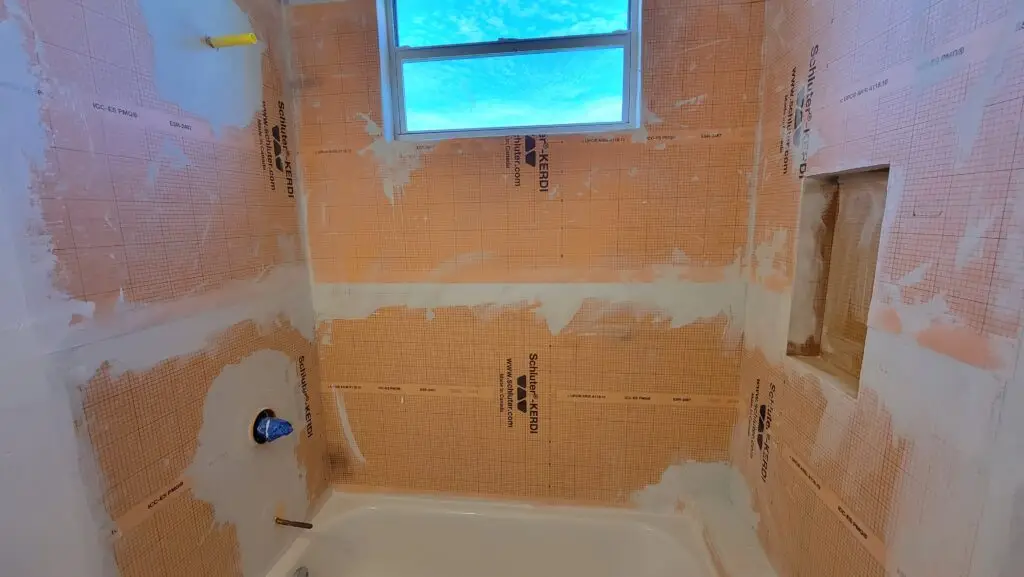
Schluter®-KERDI-BOARD
KERDI-BOARD is a lightweight foam building panel. It can serve as a tile substrate, and it can become part of a waterproofing assembly when its joints and corners are sealed. It is also used to build elements such as niches, benches and partitions. The manufacturer does not intend it for exterior use.
Schluter®-DITRA & DITRA-XL
DITRA has a different primary job: uncoupling. This ribbed membrane goes beneath floor tile and lets the substrate and the tile layer move slightly independently, helping reduce cracked tile and grout. It also provides waterproofing and vapor management when installed as part of the appropriate system. DITRA-XL is a thicker version the manufacturer recommends for certain natural stone and large-format installations. Both are for interior use and do not replace movement joints.
Not Interchangeable Products
KERDI is primarily a waterproofing membrane for wet areas; DITRA is primarily an uncoupling membrane for tile floors. Which product fits — and how it connects to drains, curbs, walls and transitions — depends on the specific assembly and the manufacturer’s requirements.
A System Approach
Substrate, membrane, seams, corners, penetrations, drainage, transitions, setting materials and installation method all have to work together. A missed seal or an unsuitable setting material at one point can affect the whole assembly. It is work no one sees once the tile is installed — which is exactly why What You Don’t See Matters Most.
BEHIND THE TILE → FINISHED RESULT · HERNANDEZ RESIDENCE, NAPLES
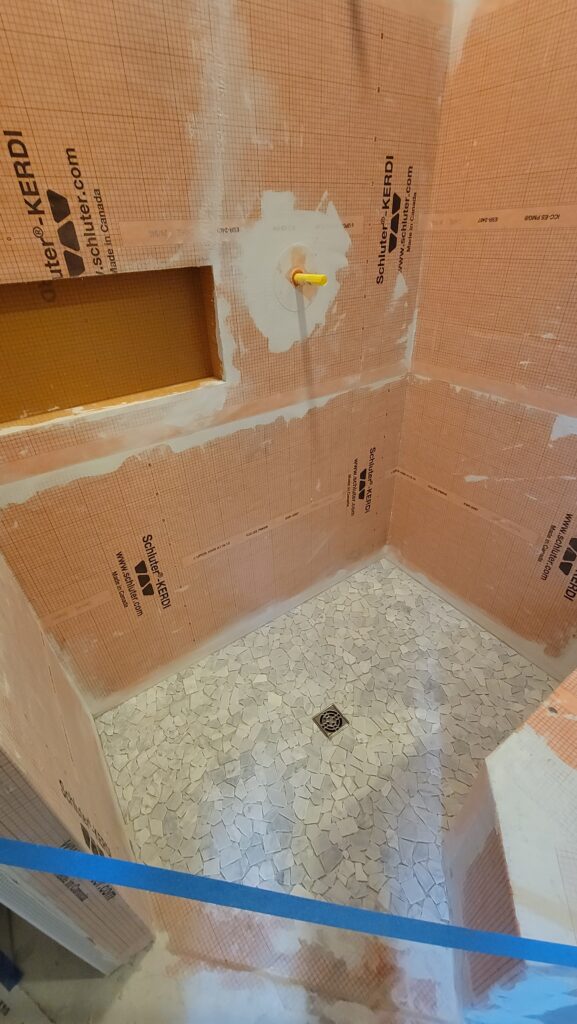
Behind the tile: Schluter®-KERDI membrane with treated seams, a recessed niche and a sealed valve penetration, before the wall tile was installed.
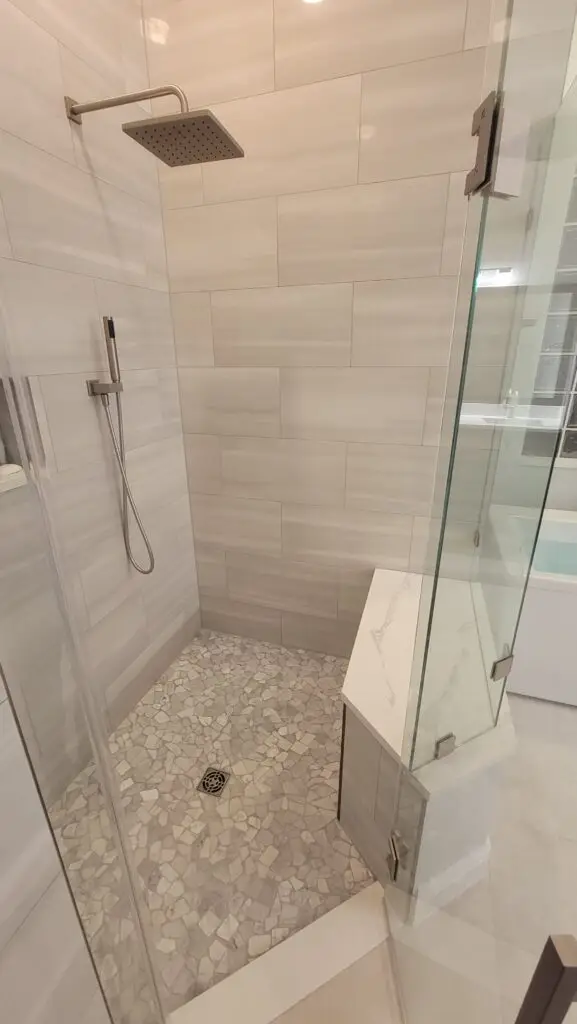
Finished result: the same shower after porcelain wall tile, niche, bench, glass and fixtures were completed.
Product descriptions on this page summarize information published by Schluter® Systems. Installation always follows the manufacturer’s current instructions. Schluter® and the product names mentioned are trademarks of their owner.
WET AREA & MOISTURE EDUCATION
PROFLEX® Systems for Moisture, Uncoupling & Wet Areas
PROFLEX® makes different products for different jobs. Several of them are membranes, but that does not make them interchangeable — each is designed for a specific function within a specific system.
PROFLEX® UCM Uncoupling Membrane
A sheet membrane designed for ceramic tile and dimension stone that serves as an uncoupling and vapor-management layer. PROFLEX also lists it for certain waterproofing and shower-pan uses when it is installed as part of the manufacturer’s system.
PROFLEX® HYDRA-LOCK
A liquid-applied waterproofing and crack-isolation membrane that limits the transfer of substrate cracks to the finish above. Because it goes on as a liquid, it can follow irregular shapes — but performance depends on the coats and coverage the manufacturer specifies and on correct treatment of transitions.
PROFLEX® HYDRA-SEAL
A thin, load-bearing, liquid-applied membrane that PROFLEX describes for crack isolation and waterproofing, suited to irregular areas such as walls and base flashings. Liquid systems typically use reinforcing fabric at corners and transitions as the manufacturer specifies.
Moisture-Mitigation Products
Moisture sealers and barriers are a separate category, designed for specific concrete moisture conditions beneath flooring. They are selected based on moisture testing and the manufacturer’s limits — and they are not the same thing as a waterproofing membrane for a shower.
Waterproofing Is a System, Not a Color
A membrane’s color does not show whether an assembly is correct, and it does not identify the brand. Performance depends on the substrate, product selection, required coats or membrane configuration, seams, corners, penetrations, drains, curing and compatibility between system components.
Different Systems, Different Roles
Harpy Enterprises may use systems from manufacturers such as Schluter® and PROFLEX®, depending on the substrate, finish material, wet or dry location, crack and movement conditions, sound and moisture requirements, and the overall assembly. No single brand is right for every project; the right system is the one that fits the assembly.
Product categories are summarized from PROFLEX® published resources — see the PROFLEX® waterproofing membranes overview. Installation always follows the manufacturer’s current instructions. PROFLEX® and the product names mentioned are trademarks of their owner.
GUIDE 05
Flooring Materials & Installation
Each flooring material has its own requirements, but they share one dependency: the condition of the floor underneath. This guide separates general considerations from Harpy Enterprises’ own project standard.
KEY TOPIC — GENERAL CONSIDERATIONS
Why Installing New Flooring Over Existing Tile Can Create Problems
Installing over existing tile can look like a shortcut, and some products allow it under specific conditions. In practice, it can raise the floor height at doorways, transitions and cabinets, hide cracks or loose tiles that may affect the new floor, and make any future removal more involved.
Whether an overlay is acceptable depends on the existing floor’s condition and the new product’s installation requirements. It is not automatically wrong — but it should be an informed decision rather than a default.
OUR PROJECT STANDARD
The Harpy Enterprises Approach
As a project standard, Harpy Enterprises generally prefers to remove existing tile and prepare the substrate before installing a new floor. Removal allows the substrate to be inspected and corrected, and keeps floor height and transitions under control. Where a different approach suits a specific project, it is discussed during the evaluation.
Floor Height & Transitions
Every added layer raises the finished floor. That affects door clearances, door jambs and casing, baseboards, appliance spaces and the transitions to adjacent rooms.
Moisture & Flatness
Most flooring products have requirements for substrate flatness and moisture conditions. Concrete slabs vary, so these conditions may need to be checked and addressed before installation.
SPC & LVP
Rigid-core (SPC) and luxury vinyl plank (LVP) floors are often installed as floating floors. They still depend on a flat substrate, appropriate expansion space and correct transitions; an uneven floor can lead to gaps, movement or locking problems.
Engineered Wood & Laminate
These materials respond to their environment and typically have acclimation, moisture and underlayment requirements set by the manufacturer. Following those requirements is part of a correct installation.
Porcelain Tile Floors
Porcelain is dense and durable, and it relies heavily on preparation, mortar coverage and layout planning — the topics covered in the preparation and tile guides above.
Substrate Access
Removing the old floor gives direct access to the substrate, so cracks, high spots and previous repairs can be seen and addressed. Explore Harpy Enterprises’ flooring installation and preparation services.
GUIDE 06
Kitchen & Interior Finish
Kitchens, bathrooms and living spaces bring several finish trades together. The order of work and the coordination between trades often matter as much as each individual installation.
Cabinets & Countertops
Cabinets need to be level and secure before countertops are measured and installed. Countertop work is often coordinated with other trades, so timing and measurements are planned together.
Backsplash Planning
Backsplash layout is planned around cabinets, countertops, outlets, windows and range hoods so cuts are balanced and edges finish cleanly.
Vanity Replacement
A new vanity can involve plumbing connections, countertop sizing and the floor or wall finish around the old unit, which may not extend under the new one.
Baseboards & Trim
Baseboards, shoe molding and trim are usually installed after the flooring so they finish neatly against the new surface.
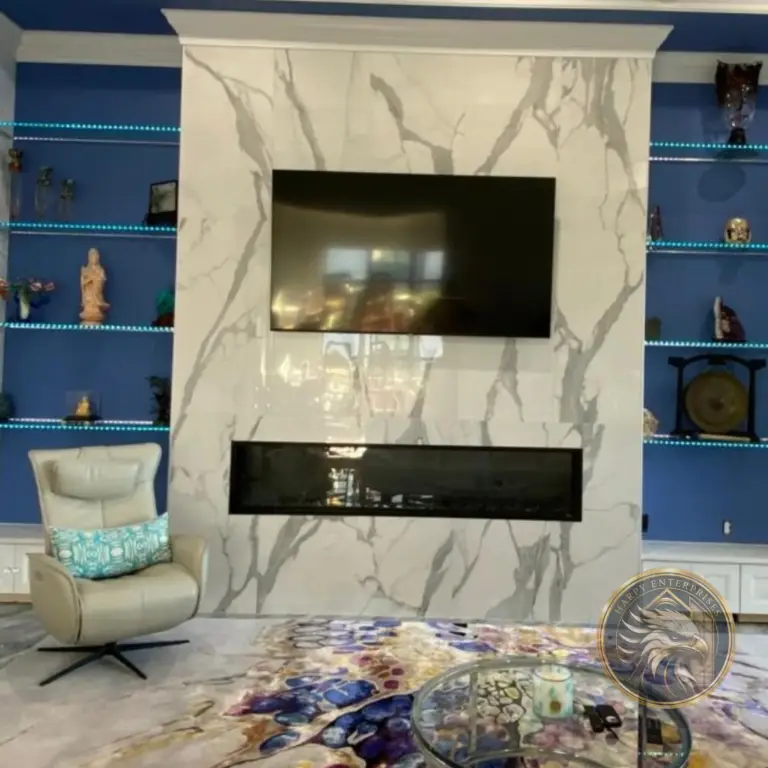
Fireplaces & Feature Walls
Tile and stone feature walls involve layout, weight and substrate considerations, and their design often depends on the fireplace unit and the surrounding wall.
Sequencing the Trades
Work typically moves from preparation through cabinets, countertops and flooring to backsplash, trim and final details. The exact order depends on the project and the trades involved.
GUIDE 07 · PAINTING EDUCATION
Residential Painting Starts Before the First Coat
Harpy Enterprises provides residential interior and exterior painting alongside its flooring and interior finish work — including walls, ceilings, trim, baseboards and doors. Paint quality matters, but as with tile and flooring, much of the final result is decided by the preparation that happens first.
KEY TOPIC
Surface Preparation Comes First
Depending on the existing surface, preparation may include inspection, cleaning, patching, drywall repair, sanding, blending texture, caulking, priming and protecting adjacent finishes. Not every project needs every step — the surface and the coating determine what is appropriate.
Once a wall is painted, the preparation underneath can no longer be seen — which is why What You Don’t See Matters Most applies to painting just as it does to tile.
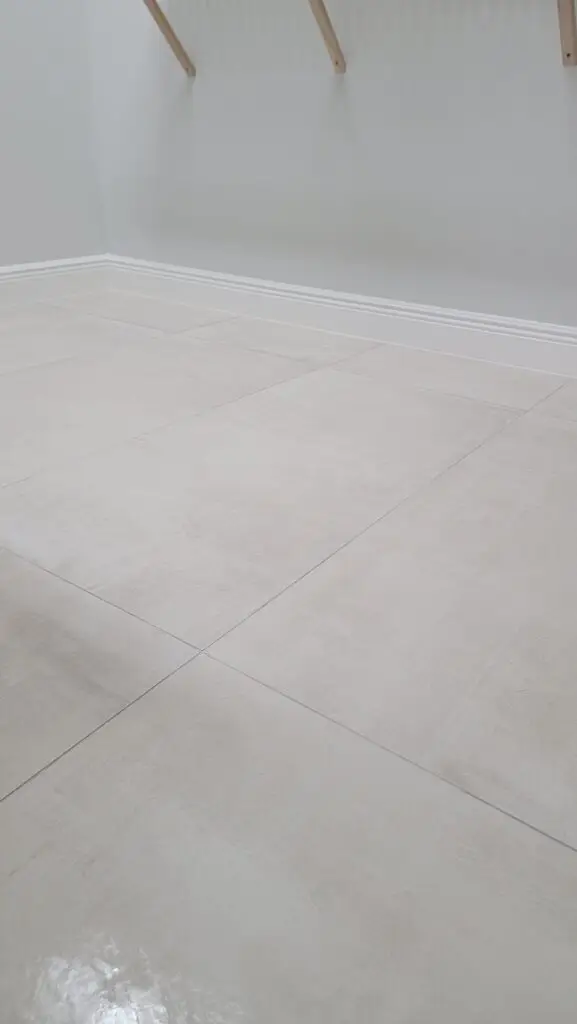
Finish coordination at the Hernandez Residence: painted wall, white baseboard and large-format porcelain floor.
Inspection & Existing Coatings
The condition of the existing paint matters. Peeling, poor adhesion, glossy surfaces or earlier repairs may affect how new coatings bond, and stains or water damage should be evaluated rather than simply painted over.
Drywall, Patching & Texture
Holes, cracks and damaged drywall are repaired and sanded, and on textured walls the repair is blended so it matches the surrounding surface once paint is applied.
Caulking, Sanding & Primer
Gaps at trim and baseboards may be caulked, surfaces lightly sanded where needed, and primer applied when the substrate, a repair or a significant color change calls for it.
Protecting the Rest of the Home
Floors, cabinets, countertops, fixtures and furnishings are covered or masked before painting begins, and adjacent finishes are protected throughout the work.
Painting guidance on this page is general. The right preparation, primers and coatings depend on each surface and project.
PAINT SHEEN
Choosing the Right Paint Sheen
Sheen describes how much light a painted surface reflects. It affects how a color looks, how visible surface imperfections are and how easily a surface can be cleaned. The right sheen depends on the room, the lighting, the surface condition and the look you want — there is no single correct answer for every space.
Flat
No visible shine. Flat finishes tend to hide surface imperfections well and are often used on ceilings and lower-traffic walls, but they are generally less washable.
Matte
A very low sheen with a soft, low-reflective look. Often chosen for living and dining areas where imperfections should stay understated but walls still need occasional cleaning.
Eg-Shel / Eggshell
A low, soft luster. A common choice for living areas, hallways and bedrooms where a balance of appearance and washability is useful.
Satin
Slightly more reflective and generally more washable than eggshell. Often considered for family spaces, children’s rooms and areas that are cleaned regularly.
Semi-Gloss
Noticeably more reflective and easier to wipe down. Frequently considered for trim, doors, kitchens and bathrooms — though it also makes surface imperfections more visible.
Gloss & High Gloss
The most reflective finishes. Often used selectively on doors, trim, cabinetry or architectural details where a crisp, reflective surface is wanted.
Sheen names and availability vary by product line, and final selection depends on the room’s function, lighting, surface condition, maintenance needs and personal preference. For manufacturer guidance, see the Sherwin-Williams® paint sheen guide.
INTERIOR COLOR
Choosing Interior Colors With the Space in Mind
A paint color is never seen on its own. Light, surrounding finishes and even the sheen change how it reads on the wall — so the best choices are confirmed in the actual room.
KEY TOPIC
Why the Same Color Can Look Different
Daylight changes through the day and with the direction a room faces. Warm and cool artificial lighting shift a color in different ways, and a flatter or glossier sheen can make the same color appear slightly darker or lighter.
A full wall also intensifies color compared with a small chip, so a shade that looks subtle on a sample can feel stronger across a whole room.
MANUFACTURER RESOURCES
Using Sherwin-Williams® Color Tools
Sherwin-Williams® offers a Color Visualizer for previewing colors on a photo of your space, along with color chips, peel-and-stick samples and small liquid samples. Digital previews help narrow choices, but screens do not show color exactly — final decisions should be checked with physical samples in the room’s own light. Harpy Enterprises uses Sherwin-Williams® coatings and color resources on selected residential painting projects.
Natural Light & Orientation
Rooms facing different directions receive different light through the day, which can warm or cool a color. Viewing samples at several times of day helps avoid surprises.
Artificial Lighting
The color temperature of light bulbs changes how paint reads in the evening. Checking samples under the lighting the room actually uses is part of a confident decision.
Ceiling Height & Room Size
Lighter colors can make a space feel more open, while deeper colors can make a large room feel more intimate. The ceiling color also affects how tall a room feels.
Flooring, Cabinets, Countertops & Tile
Fixed finishes are the hardest to change, so wall colors are usually chosen to work with their undertones — including new flooring or tile installed as part of the same project.
Trim, Furniture & Adjacent Rooms
Trim color, furnishings and the colors visible from connected rooms all influence the result. A shared palette can help open spaces feel coordinated.
Warm vs. Cool Undertones
Many neutrals lean warm or cool. Comparing undertones side by side, against the fixed finishes in the room, is often more useful than comparing color names.
Choosing a Color Palette
- Begin with fixed finishes: flooring, cabinets, countertops, tile, roof and stone
- Compare undertones, not just colors
- View samples under the room’s actual lighting
- Check them at different times of day
- Coordinate connected rooms and sightlines
- Consider how trim and ceiling colors relate to the walls
- Test exterior colors against the roof, masonry, stone and surroundings
- Remember that screens and printed chips are not exact matches for paint on the wall
EXTERIOR PAINTING
Exterior Painting Considerations in Southwest Florida
Exterior paint finishes and helps protect a home’s surfaces, and in Southwest Florida those surfaces face strong sun, heat, humidity and frequent rain. Conditions still vary from one property to the next, so each exterior is evaluated on its own.
Sun, Heat & Humidity
Intense sun can contribute to fading and coating wear over time, and heat and humidity affect how coatings dry. Manufacturers specify temperature and weather limits for application, which also influence scheduling.
Existing Coating Condition
Chalking, peeling, fading and areas of poor adhesion show how the existing finish has aged. They are assessed before new coatings are selected because they affect preparation and primer needs.
Stucco, Masonry & Trim
Stucco, masonry and trim materials each have their own preparation and coating requirements. Cracks or damage may need appropriate repair before painting, and some conditions should be evaluated by the right professional first.
Preparation & Primer
Exterior preparation commonly includes cleaning, addressing mildew and loose paint, repairing damaged areas and priming where the surface or the coating requires it.
What Paint Does — and Doesn’t — Do
Exterior paint is a finish and protective coating. It does not replace waterproofing, building-envelope systems or structural repairs, which need to be addressed separately when present.
Exterior Color Coordination
Exterior colors are usually chosen with the roof, driveway or pavers, stone, landscaping, doors, trim, architectural style, sun exposure and neighboring homes in mind — along with any HOA requirements, which may limit color choices.
Planning an interior or exterior painting project? Request a project consultation. Sherwin-Williams® is a trademark of its owner; manufacturer guidance on this page is summarized for general education.
SOUTHWEST FLORIDA
Installation Considerations in Southwest Florida
Harpy Enterprises works across Southwest Florida, with primary service in Lee, Collier and Charlotte Counties. Local conditions can influence how a project is planned — but every home and every slab is different, and each project should be evaluated on its own.
Climate & Humidity
Warm, humid conditions can affect how some materials behave and how setting and leveling products cure. Many manufacturers specify temperature and humidity ranges for installation.
Concrete Slabs
Many homes in the region are built on concrete slabs. Flatness, moisture conditions and previous repairs can vary from one home to the next and may need to be checked before installation.
Existing Tile
Many homes in the area already have tile floors, so removal, residue and substrate condition are often part of a flooring project here.
Movement & Cracks
Slabs can develop cracks over time. Some can be addressed with appropriate preparation and membranes; others may need evaluation by an appropriate professional before finish work proceeds.
Material Acclimation
Wood-based and some resilient flooring products may need time to adjust to the home’s conditions before installation, according to the manufacturer’s instructions.
Interior vs. Exterior Areas
Lanais, entries and other exterior areas face sun, rain and temperature changes. Materials and methods suited to an interior room may not be suitable outdoors, so exterior work is evaluated separately.
See the communities Harpy Enterprises serves on the Southwest Florida service areas page.
GUIDE 08
Project Planning Checklist
A few details make the first conversation more productive. Use this checklist before you request an estimate — it is fine if some answers are still open.
Before Requesting an Estimate, Know:
- The project location (city or community)
- The approximate area, if known
- Which rooms or areas are involved
- The existing flooring or finish
- The material you have in mind, if selected
- Any known damage, cracks or uneven areas
- Whether materials are already purchased
- Your desired timeframe
- Access considerations, such as occupancy, furniture or community access rules
Photos of the current space can be helpful, but they are not required to start the conversation.
Care & Maintenance Basics
Care requirements depend on the material. Porcelain, natural stone, grout, SPC/LVP, wood and laminate each have their own cleaning and maintenance guidance from their manufacturers. Following that guidance — and addressing damaged grout, caulk joints or transitions early — helps protect the installation.
Ready to Share Your Project Details?
The project request form covers many of these details, so you can send your information in one step.
REQUEST AN ESTIMATEEXPLORE THE SITE
Continue Exploring Harpy Enterprises
Services
Flooring, tile, shower, preparation and interior finish services.
Portfolio
Examples of flooring, tile, shower, kitchen and interior finish work.
Service Areas
Where Harpy Enterprises works across Lee, Collier and Charlotte Counties.
About
Harpy Enterprises’ experience and preparation-first approach.
Reviews
Client reviews of Harpy Enterprises posted on Google.
Contact
Discuss a flooring or interior finish project.
DOING IT RIGHT FROM THE BEGINNING
Have a Project in Mind?
Every project starts with understanding the space, the existing conditions and the material. Share your details, and Harpy Enterprises will review them and recommend the appropriate next step.